Thursday, June 28, 2012

Ruffled Chocolate Celebration Cake


For my dad's birthday I wanted to make something with Buttercream and Chocolate. My dad loves chocolate so I thought this recipe would be a really great choice! Oh boy was it! I must say this is the most beautiful cake I have ever made! Also this was my first time piping ruffles on a cake and I think I did a good job! So proud of myself...hee hee Makes me want to buy some more decorating tips so I can make some other designs.

This recipe came from Sweetapolita's site. She did an amazing job! It's super pretty and I love how she made it pink! I didn't want to do that with this cake...well who am I kidding I did! But I held back and use a Royal Blue Gel Color. I used about two small drops. Maybe the next cake will be pink! ^_^


Since this was my first time piping ruffles I went on youtube and checked out some tutorials on ruffling. It makes it so much easier. I used a Wilton Decorating Petal Icing Tip #123 for the ruffles and AmeriColor Gel Paste in Royal Blue. Also I didn't have Cacao Barry Cocoa Powder – Extra Dark so I used Hershey's Unsweetened Cocoa.


This Chocolate cake was really moist and delicious. The buttercream was super rich and creamy. The two worked really well with each other. I really can't wait to make this cake again!


Happy Birthday Dad!

Enjoy!

Rich & Dark Chocolate Cake
Source: Sweetapolita

Ingredients
1 3/4 cups all-purpose flour
2 cups granulated sugar
3/4 cup Cacao Barry Cocoa Powder – Extra Dark
2 teaspoons baking soda
1 teaspoon baking powder
1 teaspoon salt
2 eggs
1 cup strong black coffee (can be hot)
1 cup buttermilk, room temperature
1/2 cup vegetable oil
1 tablespoon pure vanilla extract

Method
Preheat oven to 350 F. Prepare 2 x 9″ (or 3 x 8″ for slightly shorter layers) cake pans with butter and flour or parchment paper. In bowl of electric mixer, sift all dry ingredients. Add all remaning ingredients to bowl with the dry ingredients and with paddle attachment on mixer, mix for 2 minutes on medium speed (you may need the plastic splashguard that comes with mixer) and pour into prepared pans. Batter will be liquidy.

Bake for 20 minutes and rotate pans in oven. Cakes are done when toothpick or skewer comes clean–approximately 35 minutes. Try not to overbake. Cool on wire racks for 20 minutes then gently invert onto racks until completely cool. 

Swiss Meringue Buttercream   
Source: adapted from Martha Stewart.
Sweetapolita's Notes:      
Just a note that you will need approximately 3 times the Swiss Meringue Buttercream recipe for this Rich & Ruffly cake. Because it does take some time to make, I always make in batches of 3, because it freezes so well and saves time.

Ingredients
5 large egg whites (30g each–total 150g)
1 cup plus 2 tablespoons superfine granulated sugar
1 pound (4 sticks) unsalted butter, softened, cut into cubes
2 teaspoons pure vanilla extract
Pinch of salt

Method
Wipe the bowl of an electric mixer with paper towel and vinegar, to remove any trace of grease. Add egg whites and sugar,  and simmer over a pot of water (not boiling), whisking constantly, until temperature reaches 140 degrees F, or if you don’t have a candy thermometer, until the sugar has completely dissolved and the egg whites are hot.

With whisk attachment of mixer, begin to whip until the mixture is thick, glossy, and cool. Switch over to paddle attachment and, while mixing on medium speed continously, add softened butter in chunks until incorporated, and mix until it has reached a silky smooth texture (if curdles, keep mixing and it will come back to smooth).  Add vanilla and salt, mix well. You can also add a wide variety of flavourings, extracts, and more.

Keep in airtight container in refrigerator for up to one week, leaving out at room temperature when needed, rewhipping in mixer for 5 minutes.

Can freeze for up to 6-8 weeks.

Makes approximately 5 cups of buttercream.

Thursday, June 14, 2012

Blueberry Buckle Cake


I love blueberries! Well I love all berries but my favorite would have to be blueberries. I also love Crumb Cake, so when I thought, Hey! Let me find a recipe that I can add blueberries to crumb cake! So I searched online and found this recipe from Two Peas and Their Pod. This recipe was slightly adapted from King Arthur Flour. 

This Blueberry Buckle Cake is super moist and delicious. I know I say that a lot about other treats but I'm not lying when I give my opinion on things. Before I knew it this cake was gone! My boyfriend really enjoyed it and is asking me to make another one. I will as soon as I buy some more blueberries. Oh and I used fresh blueberries in this recipe not frozen, but you can use frozen. I also used coconut milk instead of buttermilk because my boyfriend is Lactose Intolerance. It seems he can handle coconut milk without getting an allergic reaction.


I baked this on a 9-inch cake pan. As the cake was baking my home was smelling so good, like cinnamon and berries. I would bake this again just for the smell alone...lol


What I also love about cakes like this one is not only the blueberries but the crust on top of this baby! You get that crispness on the top and soft and moist on the bottom.


Definitely give this recipe a try and if you don't like blueberries that okay, you can add any other berries that you might enjoy. This is also good without any berries at all.

Enjoy!

Blueberry Buckle Cake
Yield: 8-10
Source: twopeasandtheirpod.com & slightly adapted from King Arthur Flour

Ingredients:
For the topping:
1/3 cup brown sugar
1/2 cup all-purpose flour
1 teaspoon cinnamon
1/4 cup butter

For the batter:
2 cups all-purpose flour
2 teaspoons baking powder
1/2 teaspoon salt
3/4 cup granulated sugar
1/4 cup butter
1 large egg
1 teaspoon vanilla extract
1/2 cup buttermilk (I used coconut milk)
2 cups fresh or frozen blueberries

Directions:
Preheat oven to 375 F. Grease a 9-inch cake pan and set aside

To make the topping: In a small bowl, mix together brown sugar, flour, and cinnamon. Rub in the butter using your finger tips until the mixture is crumbly. Set the topping aside.

To make the batter: In a medium bowl, whisk together flour, baking powder, and salt. In the bowl of a stand mixer, cream together the sugar and butter. Add the egg and vanilla, mix until smooth. Alternately add the buttermilk and the flour mixture to the creamed mixture, ending with flour. Stir only enough to blend. Gently fold in the blueberries.

Pour the batter evenly into prepared cake pan. Sprinkle the topping over the batter and bake for 40 to 45 minutes or until a toothpick comes out clean. Let the buckle cool for 10 minutes. Loosen the side with a knife. Holding the cake pan in your left hand, gently tip the cake out onto your right hand, remove the pan, and gently place the cake onto a  serving dish.

Tuesday, June 12, 2012

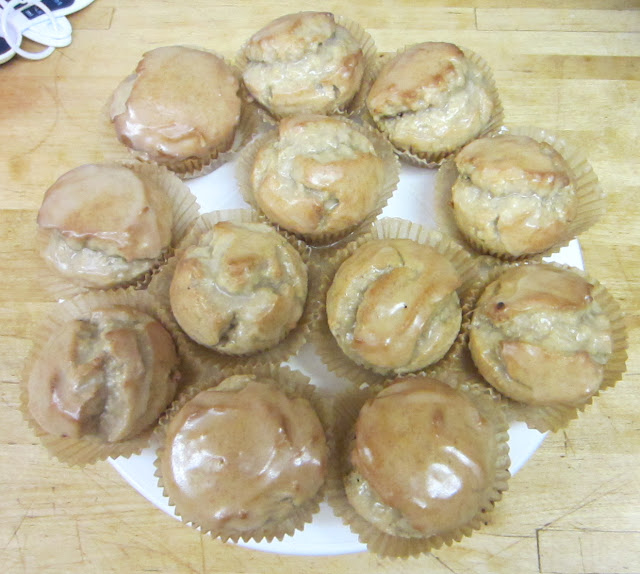
Glazed Doughnut Muffins


Lately I have been in the mood for some doughnuts, but not just any doughnuts the type that are cakey and covered in glaze. The type that smells like cinnamon when you bake them, makes your whole house smell oh so good! So I think I just found me a good recipe!

These Glazed Doughnut Muffins remind me of the Entenmann's Pop Ems. If you don't know what they are here a pic.

via Entenmanns
My boyfriend absolutely loves these Entenmann's Pop Ems, so I was looking for a doughnut recipe that would come close and boy am I glad I found this recipe!


These Glazed Doughnut Muffins are so delicious and pretty easy to make, and the bf loves them too! The glaze is what makes these Doughnut Muffins extra good! I love the ginger and cinnamon in this recipe, its makes the house smell so good that it reminds me of the holidays. I would be baking these once again!


I say bake these and try for your self, I promise you would love them!

Enjoy!

Glazed Doughnut Muffins 
Adapted from King Arthur Flour
Source: une Gamine dans la Cuisine

for the muffins

2 2/3 cups all-purpose flour
1 1/2 teaspoons baking powder
1/4 teaspoon baking soda
1/2 teaspoon ground ginger
1 teaspoon cinnamon
3/4 teaspoon salt
1/4 cup (that's 4 Tablespoons) of unsalted, room temperature butter
1/4 cup vegetable oil
1/2 cup granulated sugar
1/3 cup packed, light brown sugar
2 room temperature eggs
1/2 teaspoon pure almond extract
1 cup buttermilk (milk or cream will work too) (I used coconut milk)

for the glaze (adapted from allrecipes)

3 Tablespoons of unsalted butter, melted
1 cup confectioners’ sugar
1/4 teaspoon pure almond extract
2 tablespoons hot water

method:
Preheat the oven to 425 F., and either line muffin tin with cupcake liners, or lightly grease the tin. 

[Note: This recipe will make 12 muffins.]

In a large bowl, whisk together the flour, baking powder, baking soda, ginger, cinnamon, and salt; Set aside.
In a separate, large mixing bowl, beat together the butter, oil, and sugars until well combined and creamy. (It's okay if it's a little bit lumpy.] Add the eggs, one at a time, beating well after each addition and scraping down the sides of the bowl as necessary. Add the almond extract and beat to combine.
Switch over to a large wooden spoon or rubber spatula and Stir the dry ingredients into the butter mixture alternately with the buttermilk, beginning and ending with the flour and making sure everything is thoroughly combined.
Divide the batter evenly among the prepared muffin tin (each cup should be almost full).
Bake for 15-17 minutes, or until light golden. (A thin knife inserted into the muffins should come out clean.)
Remove the tin from the oven and allow the muffins to rest in the pan as you prepare the glaze.

Glaze: In a medium-size bowl, combine the melted butter, confectioners' sugar, almond extract, and hot water. Whisk until smooth.
As soon as the the muffins are cool enough to touch, gently remove them from the tin and dip each muffin crown into the glaze. Set the muffins aside and allow the glaze to harden before serving (this should only take about 10 minutes.) If you have any left-over glaze, you can spoon it over each muffin just before enjoying with a cup of strong, creamy coffee!

Makes 12 muffins

Sunday, June 10, 2012

Cornbread In Cast Iron Skillet


So ever since I bought a Cast Iron Skillet (from Amazon) I have been cooking with this baby non-stop! I've always wanted one and happy to finally get one! This Cast Iron Skillet is per-seasoned which I'm pretty happy about that! But if it has to be re-seasoned; I have all the instructions I need from lodgemfg.com.

Any who, I've always wanted to bake Cornbread on one and so glad I did! It was crispy on the edges. Taste really good with some extra butter melting on the top of this baby! So I added about a tablespoon or so to this Cornbread as it came out the oven.


Love Cornbread warm out the oven, I just couldn't wait for it to cool...lol Added some more butter to it again! I think I'm like Paula Deen when it comes to butter, I swear!

Got this recipe online at grouprecipes.com from thenewagecook. Crispness on this Cornbread is absolutely delicious! I'm looking forward to baking some more tasty treats on the Cast Iron Skillet!

If you don't own a Cast Iron Skillet then what is wrong with you? No just kidding if you don't have one you can always bake this in a 8 x 8 baking pan.
 
Enjoy!

Cornbread In Cast Iron Skillet
25 minutes to bake Serves: 8
Source: thenewagecook

Ingredients 

1/4 cup of Butter

1 cup of white or yellow cornmeal (I used ground yellow cornmeal)

1 cup of all-purpose flour or Bisquick or fresh ground whole wheat flour

1/4 cup of granulated white sugar

 4 tsp of baking powder

1/2 tsp of salt

1 cup of milk or buttermilk (I used coconut milk)

1 egg

1/4 cup of vegetable oil or olive oil

Directions 

Preheat oven to 425F.

Place the butter into a 10-inch heavy bottom ovenproof frying pan or cast iron skillet and heat in the oven until butter is melted.

NOTE- Heating the butter in the skillet until it's hot and melted before adding the batter, guarantees a desirable CRISPNESS on the outer edges of the bread.

While the pan is heating and the butter is melting, prepare your cornbread batter.

In a large mixing bowl, stir together the cornmeal, flour, sugar, baking powder, salt, buttermilk and egg until well blended- wire whisk if possible.

Pour batter into the HOT and buttery skillet (batter will sizzle), return to the oven and bake for 20 - 25 minutes until bread is golden brown and a toothpick or cake tester inserted into the center will come out clean.

Remove from oven and let cool on a wire rack for approximately 5 minutes.

Invert cornbread onto a large plate and cut into wedges.

Makes 6 - 8 cornbread wedges.

Notes: I used a 12-inch Cast Iron Skillet. This recipe calls for a 10-inch so 12-inch came out thinner.

Monday, June 4, 2012

Chocolate Chip Cookies


So I'm always on the hunt for some more delicious Chocolate Chip Cookies and I found another great recipe!

I was on Amazon a few days ago looking for some delicious baking books. I found this one book called Cookie Cravings: 30 All-Time Favorite Recipes. This is the Kindle Edition for $0.99! Only under a dollar, I had to order it, so I did! This book is by Maria Lichty. She has a blog called Two Peas and Their Pod.  There's a bunch of great recipe on there so check out her site!

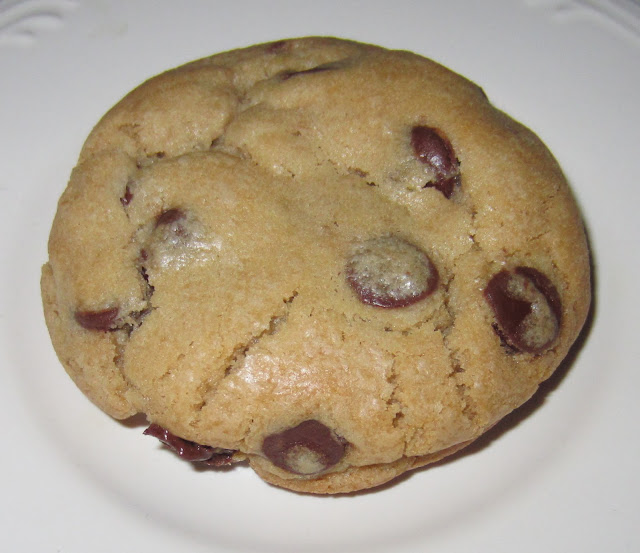
So as I was saying I was looking for another great Chocolate Chip Cookie recipe and decided to make this one! She calls it "Our Favorite Chocolate Chip Cookies". I can now understand why this recipe is her favorite! It's super chewy and soft! I'm glad I didn't bake all the dough cause I would love to see how these cookies taste after 72 hours.

Once I made the recipe I refrigerated the dough for 24 hours! The dough can be chilled for 72 hours.

This is the cookie dough after being refrigerated for 24 hours. I didn't have a bigger cookie scoop then the 1 1/2 in. as you see in the above picture. So I just scooped some cookie dough out and added two scoops together, then rolled them into a ball. I did that so I could achieve a big cookie.

Here are the cookies after being removed from the oven. I left them on the pan for about 3 minutes and then transfer them to a cooling rack.

Here they are cooling. Don't they look so good? Don't be tempted to try one just yet, there hot! Wait until the cookies are completely cool. Once there cool try a piece, then maybe another! ^_~


Mmmm...look at that delicious cookie! Well I'm about to head to the kitchen and bake up some more! I also have another cookie recipe called New York Times Chocolate Chip Cookies, which are awesome! {recipe here!} Like always the recipe for these "Our Favorite Chocolate Chip Cookies" will be down below!

After 72 hours from being chilled in the refrigerator, these cookies came out some much better! It's more crispy around the edges and chewy in the center!

Let me know what's your favorite cookie recipe, so I can try them out!

Enjoy!


Our Favorite Chocolate Chip Cookies
Makes 20 large (4-inch) cookies // Bake Time: 12-14 minutes

2 1/2 cup all-purpose flour
2 cups cake flour
1 1/2 teaspoons baking powder
1 1/2 teaspoons baking soda
1 teaspoons sea salt
1 1/2 cups (3 sticks) unsalted butter, at room temperature
1 1/4 cups light brown sugar
1 cup granulated sugar
2 large eggs
3 teaspoons vanilla extract
2 cups semi-sweet chocolate chips
Sea salt, for sprinkling

1. In a large bowl, whisk together the all-purpose flour, cake flour, baking powder, baking soda, and sea salt. Set aside.

2. In the bowl of a stand mixer, beat the butter, brown sugar, and granulated sugar together until smooth and creamy, about 5 minutes. Add in the eggs, one at a time. Add in the vanilla extract and mix until combined.

3. With the mixer on low, slowly add the dry ingredients to the wet ingredients, about 1/2 cup flour mixture at a time. Mix until just combined. Stir in the chocolate chips.

4. Wrap the cookie dough in plastic wrap and chill for at least 24 hours. The dough can be chilled for 72 hours.

5. When ready to bake, preheat the oven to 350 degrees F. Line a large baking sheet with a Silpat baking mat or parchment paper. Take about 1/4 cup of cookie dough and roll into a large ball. Place cookie dough balls on the prepared baking sheet, about 3 inches apart. Sprinkle with sea salt. Bake cookies for 12-14 minutes, or until the cookies are slightly golden brown around the edges. Remove from the oven and let cookies cool on the baking sheet for 3 minutes. Transfer to a wire cooling rack and cool completely.
Related Posts Plugin for WordPress, Blogger...